概要
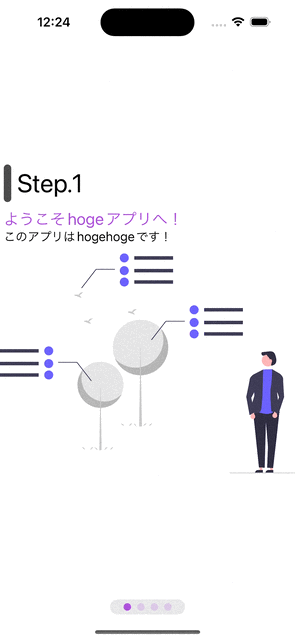
TabViewを使って以下の様なアプリ起動時に表示するOnboardingを作成してみたいと思います!
環境
この記事は以下のバージョン環境のもと作成されたものです。
【Xcode】14.0.1
【iOS】16.0.2
【macOS】Monterey バージョン 12.6
TabViewの基本的な使い方
TabViewを使用することで簡単にタブと、そのタブに応じたViewを表示するViewを生成する事ができます。
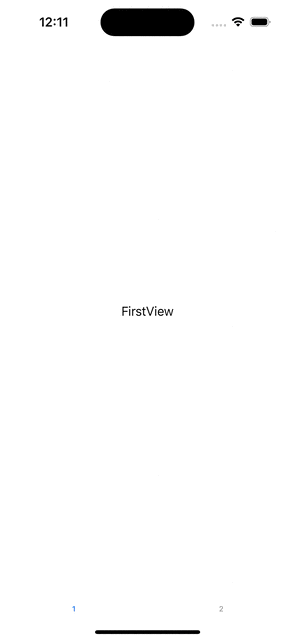
サンプルコード
struct OnboardingView: View {
    var body: some View {
        TabView {
            FirstTabView()
                .tabItem {
                    Text("1")
                }
            SecondTabView()
                .tabItem {
                    Text("2")
                }
        }
    }
}

struct FirstTabView: View {
    var body: some View {
        Text("FirstView")
    }
}

struct SecondTabView: View {
    var body: some View {
        Text("SecondView")
    }
}
TabViewの中に表示制御行いたいViewを定義します。
そのViewに対して.tabItemとmodifierを追加します。
.tabItem内はTextやImageを定義する事でタブ部分の表示に反映されます。
Tabの背景色やアイコンに色を付ける方法
iOS16から新しいmodifierが追加されたので再現方法がいくつかあります。
まずUITabBar.appearance().backgroundColorを使用する方法です。
struct OnboardingView: View {
    init(){
        UITabBar.appearance().backgroundColor = UIColor.yellow
    }
    var body: some View {
・・・
        }
}

選択しているタブアイコンの色はaccentColor modifierを使用します。
TabView {
・・・
}
.accentColor(.red)

ちなみに以下でもタブアイコンの色を変更できそうですができないです。
.tabItem {
    Text("1")
        .foregroundColor(.red)
}

選択外のタブアイコンの色はUITabBar.appearance().unselectedItemTintColorを使用します。
struct OnboardingView: View {
    init(){
        UITabBar.appearance().backgroundColor = UIColor.yellow
        UITabBar.appearance().unselectedItemTintColor = UIColor.red
    }
    var body: some View {
・・・
    }
}

また背景色に関してはiOS16からtoolbarBackgroundを使用することができます。
TabView {
    FirstTabView()
        .tabItem {
            Text("1")
        }
        .toolbar(.visible, for: .tabBar)
        .toolbarBackground(
            Color.pink
            , for: .tabBar
        )
    SecondTabView()
        .tabItem {
            Text("2")
        }
}

Onboardingを作成
tabViewStyleを使用することでタブのアイコンを非表示にして、スワイプ動作で各タブのViewを切り替える事ができます。
struct OnboardingView: View {
    @State private var selectedPage = 1
    var body: some View {
        TabView(selection: $selectedPage) {
            FirstTabView()
                .tabItem {
                    Text("1")
                        .foregroundColor(.red)
                }
            SecondTabView()
                .tabItem {
                    Text("2")
                }
        }
        .tabViewStyle(.page(indexDisplayMode: .never))
    }
}

今回はIdentifiableに準拠したstructを作って、ForEachで各タブのViewを生成したいと思います。
ForEachの使い方がわからない方は是非以下の記事見てください。
struct Onboarding: Identifiable {
    var id: Int { pageNum }
    var pageNum: Int
    var title: String
    var description: String
}
作成したstructを使用してViewを作ります。
struct OnboardingView: View {
    @State private var selectedPage = 1
    let onbordings: [Onboarding] = [
        .init(pageNum: 1, title: "ようこそhogeアプリへ!", description: "このアプリはhogehogeです!"),
        .init(pageNum: 2, title: "使い方の説明だよ!", description: "使い方はhogehogeです!"),
        .init(pageNum: 3, title: "その他の説明だよ!", description: "その他はhogehogeです!"),
        .init(pageNum: 4, title: "最後に!", description: "この記事がよかったらいいねしてね!")
    ]
    var body: some View {
        VStack {
            TabView(selection: $selectedPage) {
                ForEach(onbordings) { index in
                    VStack(alignment: .leading) {
                        VStack(alignment: .leading) {
                            HStack {
                                RoundedRectangle(cornerRadius: 5)
                                    .foregroundColor(.black.opacity(0.7))
                                    .frame(width: 10, height: 50)
                                Text("Step.\(index.pageNum)")
                                    .font(.largeTitle)
                            }
                            VStack(alignment: .leading) {
                                Text(index.title)
                                    .font(.title2)
                                    .foregroundColor(.purple)
                                Text(index.description)
                            }
                        }
                        .padding(.leading, 5)
                        Image("\(index.pageNum)")
                            .resizable()
                            .aspectRatio(contentMode: .fit)
                    }
                    .tag(index.pageNum)
                }
            }
            .tabViewStyle(.page(indexDisplayMode: .never))
            Spacer()
            ZStack {
                Capsule()
                    .frame(width: 100, height: 20)
                    .foregroundColor(.gray.opacity(0.2))
                HStack {
                    ForEach(onbordings) { index in
                        Circle()
                            .foregroundColor(.purple.opacity(selectedPage == index.pageNum ? 1 : 0.2))
                            .frame(width: 10, height: 10)
                            .onTapGesture {
                                selectedPage = index.pageNum
                            }
                    }
                }
            }
        }
        .animation(.easeInOut, value: selectedPage)
    }
}
tabViewStyleでタブの部分が可視化されていないので擬似的にCircleで作成し、onTapGestureでselectedPageにindex.pageNumを渡す事でページを飛ばして遷移できるようになっています。
またanimationを付ける事でスワイプ動作と同じ様にスライドして遷移しているように表現できます。
まとめ
TabViewを使用してOnboardingを作ってみました!
時間ができたら汎用的に使用できる様に作り直してPackage化して公開したいと思います!